In the Industrial Hygiene menu, click Noise Monitoring.
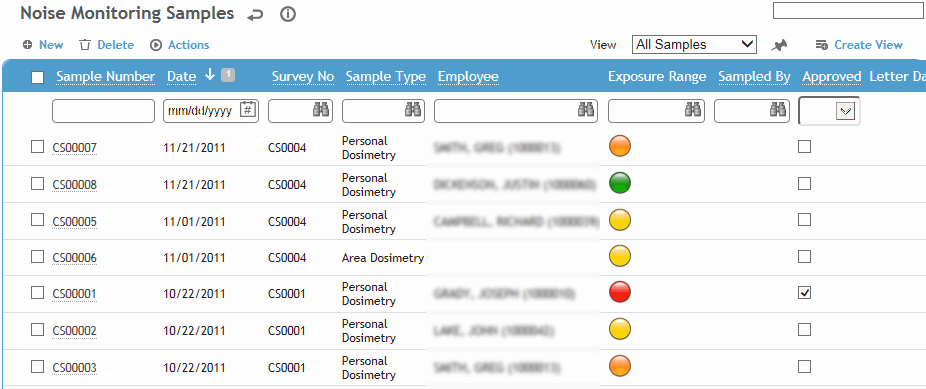
Click a link to open a sample, or click New.
To reduce data entry, you can copy a sample record. Open the record and choose Actions»Copy. All information is copied except details unique to the sample (e.g. employee, calibration data, results). Change information as required (and complete the mandatory fields) to complete the new sample.
To open all samples with the same survey number, select the check box beside a sample that is linked to that survey number, then choose Actions»Open All Samples Linked to Same Survey Number. The first sample opens, and navigation buttons below the tabs allow you to scroll through each sample. You may also use this action to view samples that are part of a linked sample set.
Depending on your system settings, sample numbers may include a set prefix. If the sample number exceeds 999999, you will be prompted to change your the prefix in the system settings so the numbering can restart at 000001.
Select the layout you wish to use (e.g. Personal Dosimetry, Area Dosimetry, Source Dosimetry, Area and Source) or a custom layout that you have created.
The layout determines which fields are available on the form. Personal dosimetry samples will have a field available to note employee. Any of the dosimetry layouts will have fields for dosimetry data (i.e. TWA, Dose, projected Dose); Area and Source layouts will have fields for sound level measurements and octave band analysis.
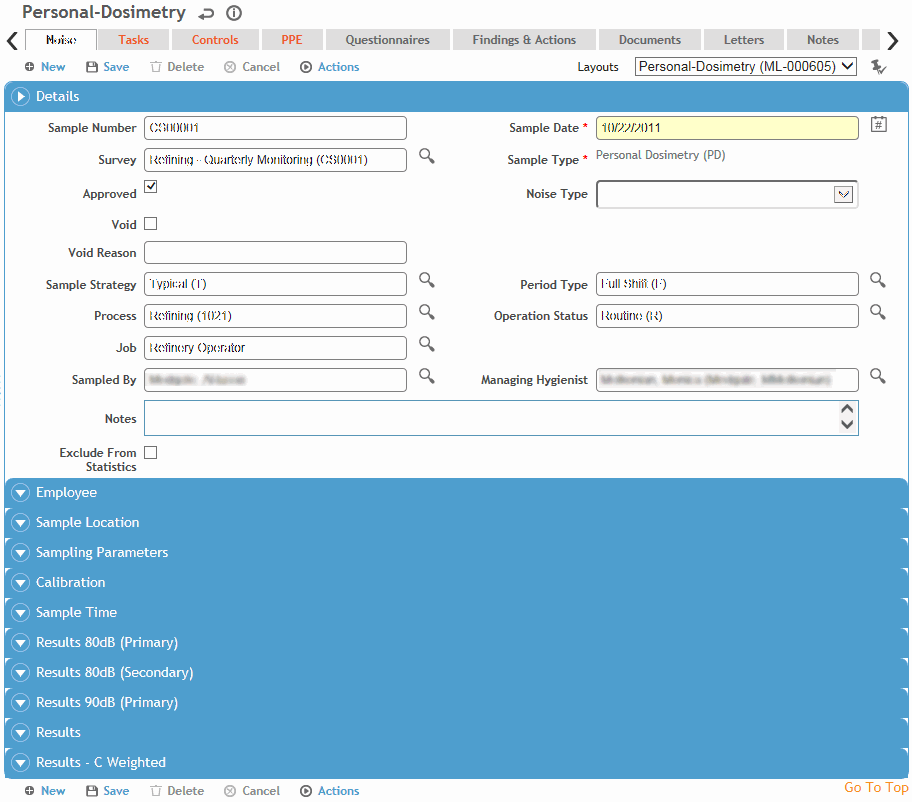
Enter information in the fields on the Noise tab. Most of the fields are self-explanatory, but keep in mind the following:
-
The Managing Hygienist defaults to the hygienist linked to the Sampled By user, but you can change it. The look-up for this field is limited to users flagged as “IHUser” and “Managing Hygienist”.
-
Select Exclude from Statistics to exclude the sample from the Detailed Noise Monitoring Results report and the statistical analysis run from the IH Risk Assessment module. This exclusion can be overridden when running the queries.
-
Employee information (employee name, geographic location and so on) is current. If necessary, change the information to correspond to the situation that existed when the sample was taken.
To associate other employees with a personal area sample, use the Representative Employees tab (after the sample is saved).
-
Enter information about the sampling equipment and sample results. Enter the exchange rates and criterion levels if they were not set in your system settings. The Tertiary Exchange Rate and Tertiary Criterion Level relate to the fields in the Results-C Weighted section.
Click Save.
To print all information on the Noise tab, and any questionnaire included, click Print.